Queensberry wants to supply you with prints that are high quality and predictable. To us that means, what you see on screen is what you get. Making sure that happens is what soft-proofing is all about… But it’s not automatic and must be done by you before you send us your files. In this article we describe how to set up Queensberry’s proofing ICC profile, soft proof and how to edit in proof mode.
What Soft Proofing does and why it’s important
You capture images on different cameras, display them on different monitors (some your own, some at our Lab) and then print them.
All those devices and media capture and display colour differently. However, provided you have your colour management system set up correctly, you can preview on screen, to a reasonable degree of accuracy, what your image will look like after printing, and make adjustments to get the results you want.
For soft-proofing to work, several conditions must be met – Follow the additional links to ensure your monitor and photoshop are set up to accurately display colour.
-
You monitor calibration must be accurate (and active);
-
You must have Photoshop’s colour settings set up as we recommend;
- Photoshop must be set to soft proof using the appropriate (eg Queensberry ICC profile) Read below.
Although soft-proofing is complicated by the fact that the colour of the printed image will vary, not just with the printer but also with the stock it's printed on, we've kept things simple for you.
What we have done is rather than treat each different paper stock in isolation, they have been tuned back so they give a similar look. So the profile of the paper is different, the end result is the same. which is why we give you only one soft proofing profile. And for soft proofing that's what matters. Consistent results - you send us your files, we send them to the printer and you know what you are getting back.
Installing Queensberry’s Soft Proofing Profile
In colour management, an ICC profile is a set of data that characterizes a colour input or output device.
Before you can begin soft-proofing you must ensure your screen is calibrated, your photoshop working (colour) space is set up correctly and your other colour settings. Then you must download Queensberry Soft Proofing ICC profile.
You need this profile installed in order to "preview/soft-proof" your image files (ie view them on your monitor as they will appear after we've printed them).
Download the profile from this page and copy it into the Colour Profile folder on your computer.
To do this, in the main finder menu select GO. Hold down option until Library shows up. Open that folder. Find ColorSync and then add the ICC profile to profiles, by dragging it into the folder.
Now that you’ve installed our ICC profile, it’s time to link this profile to your Photoshop soft-proofing settings.
Set up Photoshop to show you how your images will print
Let's assume your monitor is calibrated and you’ve set up Photoshop (the following process is the same on Windows and Mac):
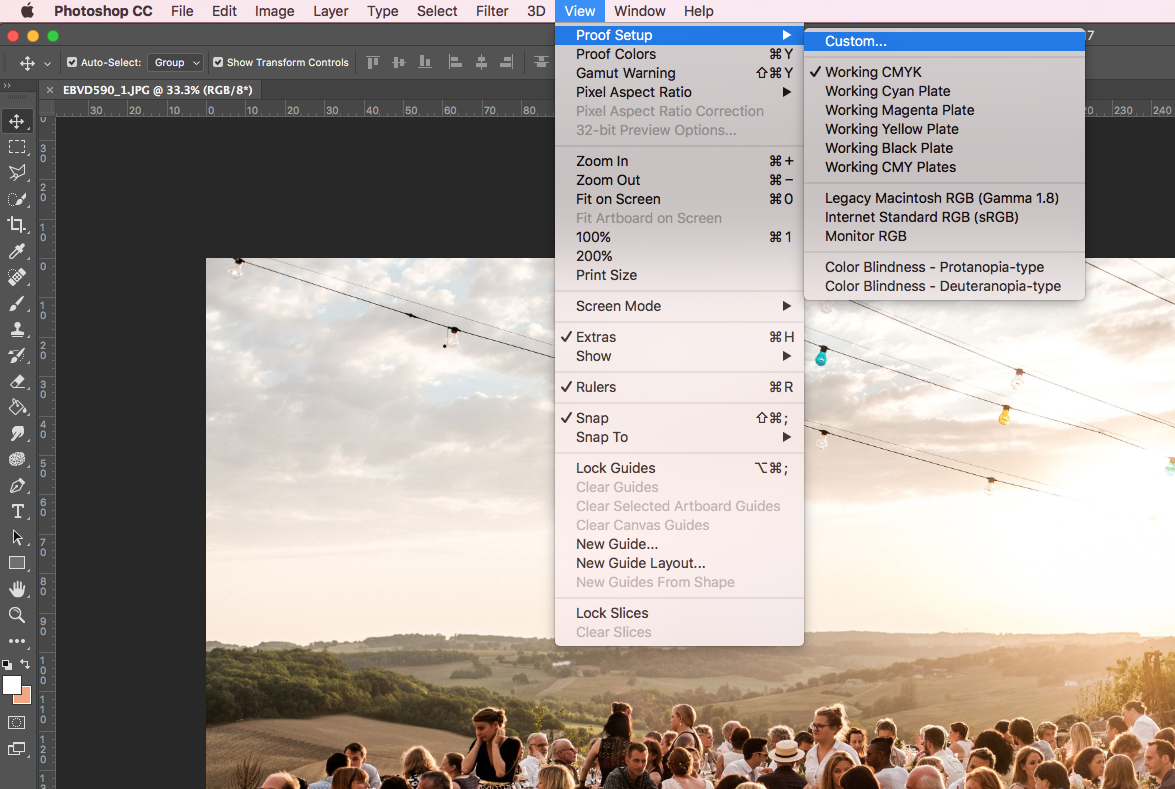
Step One: Under Photoshop's View menu select Proof Setup / Custom.
Step Two: You'll see the currently active proof setup at the top of the dialogue that opens. What you need to do is select a new "Device to simulate", as in the graphic. Scroll down the list and select the Queensberry profile. As soon as you do so the name of the current proof setup will disappear and change to "Custom"
Step Three: Select "Rendering Intent: Perceptual", and make sure that Black Point Compensation is checked, and that all other check boxes are un-checked.
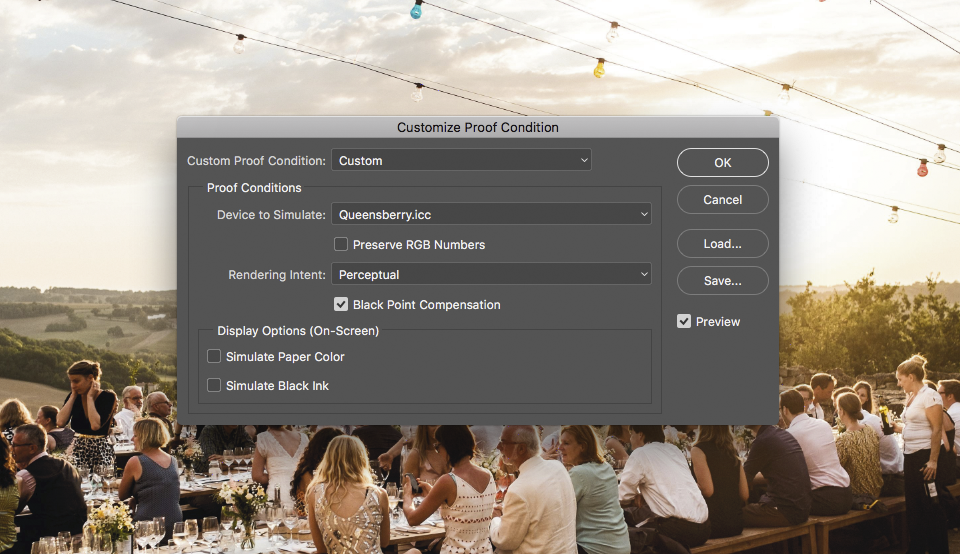
Step Four: Click the Save button and save your new setup using the same name as the profile (eg "Queensberry") or another meaningful name. Once you've saved, the new profile you've just installed will be added to the list under View / Proof setups.
How to Soft Proof
Having selected a proofing profile you can toggle back and forth between viewing the image in the document’s own colour space and the proofing colour space by selecting the second item on the menu (View > Proof Colours). The keyboard shortcuts are Cmd-Y on Macintosh or CTRL-Y on Windows.
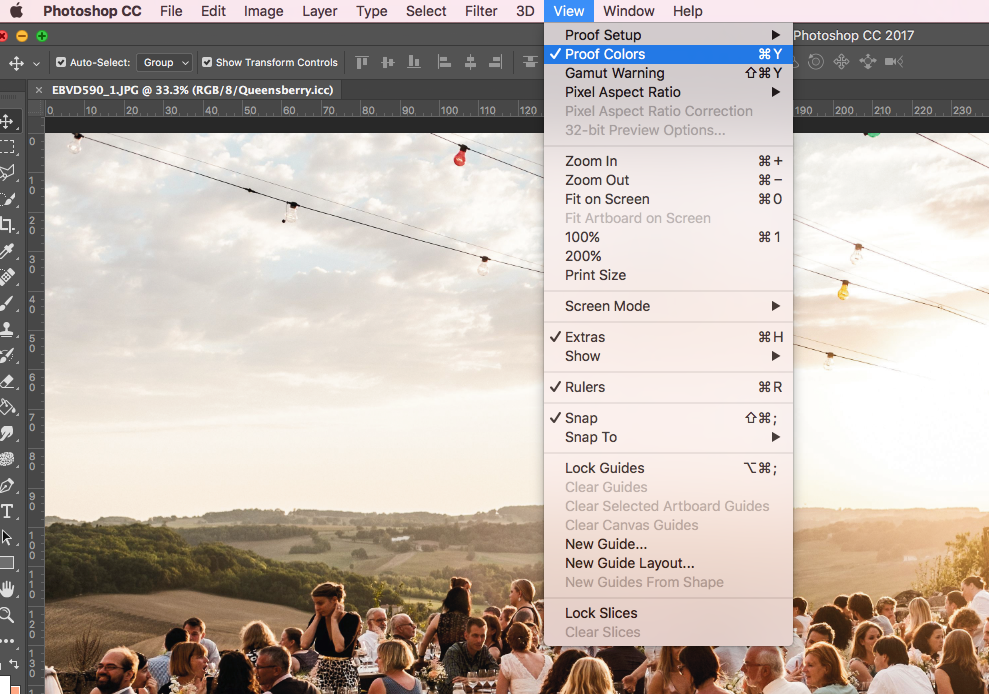
When you're viewing the image in proof colour mode the name at the top of the image window will change from (eg) "filename.JPG @ xx% RGB/8" to "filename.JPG @ xx% RGB/8/Queensberry". This confirms that you're viewing the image as a soft proof (mimicking the way the image will look when printed) and also shows which proof profile is being applied.
If your image is accurately profiled, you've accurately profiled your monitor using a colorimeter, and you've set up Photoshop correctly, the image on the screen should now look as it will after printing!
Editing in proof-mode
You can edit your images as normal while in proof mode. If so, just bear in mind that the file's working (colour) space remains the same. Photoshop is simply applying the output profile before displaying it on your screen.
If you prefer to edit, not in proof mode
If you prefer not to edit in proof mode, you have two other choices:
- Toggle in and out of Proof mode (again using CMMD-Y on Macintosh, or CTRL-Y on Windows) so that you can check the appearance of the finished print.
- Open a second window for the same file: Window > Arrange > New window for [filename]
You can set the second window to Proof mode and what you see there will be updated on the fly as you edit in the first window. This is particularly convenient if you have two monitors (but don’t forget - both must be accurately profiled!)
Whichever option you chose, you can check for any colours in the file that can't be represented in the output working (colour) space (View > Gamut Warning).
Alexandria
Comments