Order Custom Embossing if you want us to emboss a product with artwork that you supply, such as a monogram or logo, or if you want to use a font that is not available in our selection of standard embossings. The cost will depend on the size.
To avoid delays and extra charges it's important to send us production-ready artwork. Before you use this service please read this article carefully to understand:
- the sizes of the embossing blocks we offer
- what we can (and cannot) emboss
- how to create the artwork (in Illustrator or Photoshop), and
- how to upload the artwork to Workspace
Please be sure to read our design tips below, and if you have questions email info@queensberry.com
Download our blank templates for Illustrator and Photoshop here.
File Specifications
To create an embossing block we need outlined, 100% black vector file. If someone else is creating the artwork please ask them to supply in that format.
If you cannot supply us outlined vector files, please download our PSD templates. You can export the files in JPG, PNG, PSD as long as they're high resolution 1200 dpi files. For further details, please see instructions below.
Embossing template sizes
Embossing sizes: The cost of embossing depends on which of the following templates best fits your artwork. The smaller the cheaper! Price 1 is the same price as our standard text embossing. The artwork doesn't need to cover an entire template, just fit within it. You'll find prices on our album and box calculator pages.
Download our blank templates for Illustrator and Photoshop here.
Template dimensions in millimetres
- Price 1: 70 x 37, 100 x 25 or 147 x 15
- Price 2: 70 x 70, 100 x 45 or 160 x 30
- Price 3: 70 x 100, 100 x 70 or 160 x 45
- Price 4: 100 x 108 or 160 x 70
- Price 5: 160 x 108
Approximate dimensions in inches
- Price 1: 2.8 x 1.5, 3.9 x 1.0 or 5.8 x 0.6
- Price 2: 2.8 x 2.8, 3.9 x 1.8 or 6.3 x 1.2
- Price 3: 2.8 x 3.9, 3.9 x 2.8 or 6.3 x 1.8
- Price 4: 3.9 x 4.3 or 6.3 x 2.8
- Price 5: 6.3 x 4.3
Design Tips
Simple artwork is best: Intricate graphics won’t emboss well, and are usually better printed on the title page. Always bear the finished size of the template in mind when you create the artwork, as lines and text may become too fine to emboss when scaled down.
Letter height: The overall height of text letters need to be at least 4mm (0.16in) after they've been scaled to the final size.
Please double-check spelling, especially proper names. We cannot be responsible for errors in the artwork you supply.
For practical reasons, we cannot emboss all our cover materials. With literally hundreds of possible combinations, it could be your first choice is not suitable in practice. If so we will contact you.
Foil colours: We offer seven different foil colours. Rose Gold, Gold, Silver, Steel, Black, White, and Copper.
Position: Embossings are normally placed optically centre of the cover, but within limits you can request a different position (bottom right, spine etc). If necessary please add a note in Special Instructions to explain where you want the embossing placed. If you'd like a proof of the size and position, just add a note in the special instructions.
Trouble-shooting: If your artwork doesn't seem suitable for embossing, or doesn’t match our templates or file specifications, we will put your order on hold and ask you to correct it. We can do this for you but extra charges may apply.
If you'd like us to do the work for you: If your clients supply an image file or physical artwork to emboss you will need to recreate it as a vector file. This can often be a difficult job. We explain how to do this here but, if you'd prefer us to do the work, send the image as a bitmap file (.BMP) to orders@queensberry.com together with the proposed album size, cover material and foil colour. Our artwork team can then estimate the extra cost of creating the file for you.
File set-up using Illustrator
Illustrator is our preferred program for creating vector art for custom embossings. This section explains how to convert bitmap artwork to the required vector format. If you're unfamiliar with or don't have access to Illustrator, or would prefer to use Photoshop, scroll down to view our Photoshop instructions as the workflow is quite different. The Photoshop section will also help if you need to prepare artwork before importing it to Illustrator.
Important: any jagged outlines will be obvious in the final embossing, so your artwork needs to be large enough that when you define the paths ("Create Outlines") enough detail is captured to render the lines smoothly.
WORKFLOW TO SET UP A CUSTOM EMBOSSING BLOCK IN ILLUSTRATOR
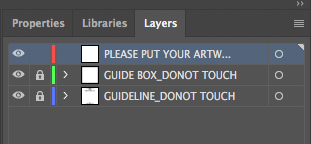
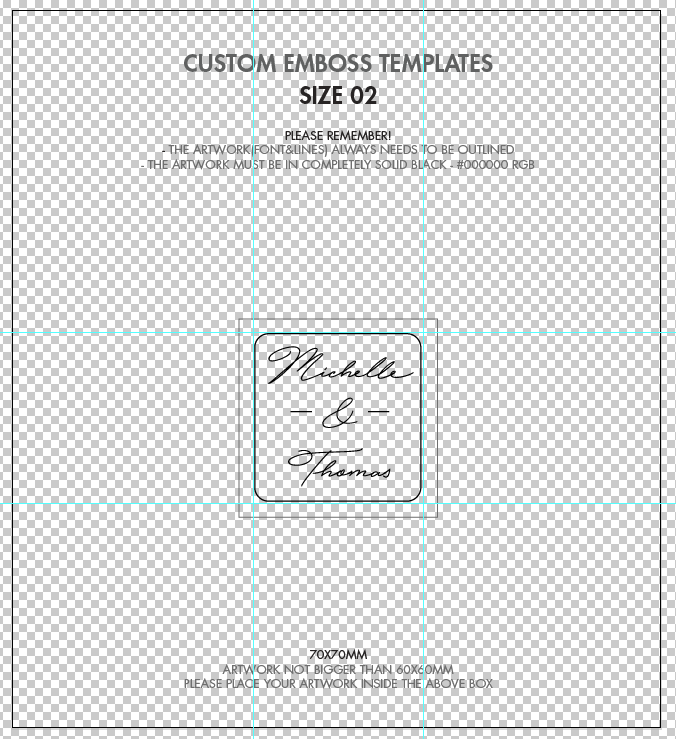
Step 1: Download our Custom Embossing templates and open the template with your selected size. (If you're setting up the artboard manually please ensure your file is set to the correct resolution of 300DPI.) Once the template file is open, select the layer 'PLEASE PUT YOUR ARTWORK HERE’ to create or place your artwork.
Download our blank templates for Illustrator and Photoshop here
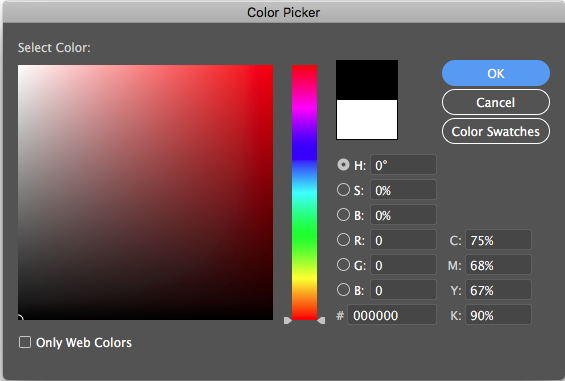
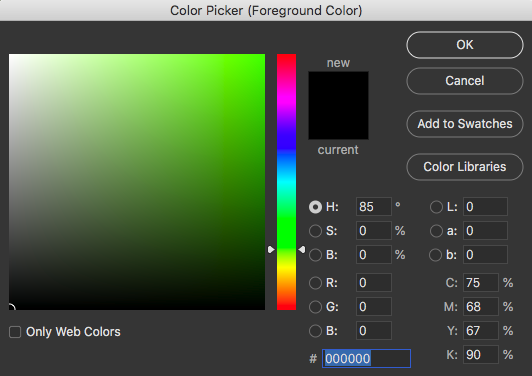
Step 2: After creating your design ensure every element in it is 100% Solid Black. To ensure your artwork is 100% black hover over the text or artwork and open the “Colour Picker.” Move the colour selector down to the bottom left-hand corner until it reads that your colour is #00000.
Please work inside GUIDEBOX and make sure that your artwork size does not extend past the Guide Ruler lines. (Click ‘Command+;’ to show the guides.)
Changing colour to 100% Black (#000000)
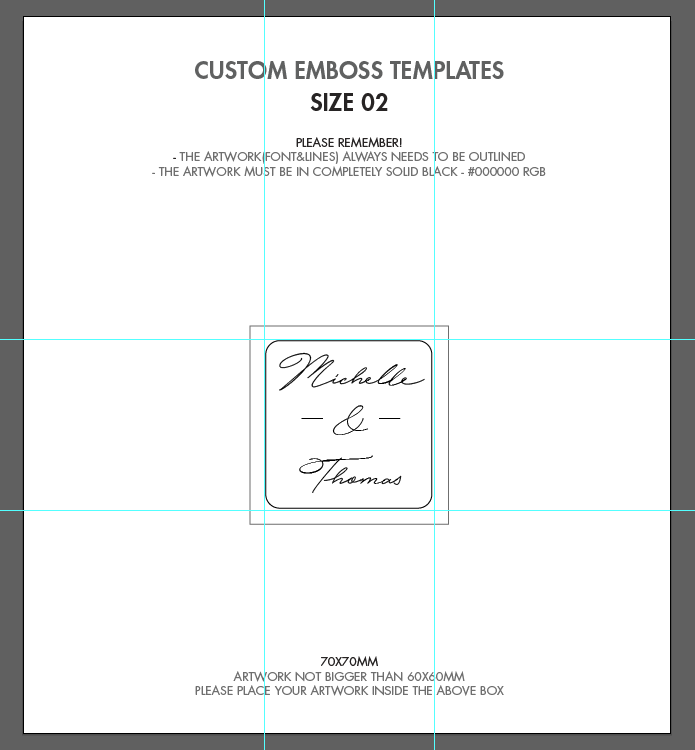
Click ‘Command + ;’ to show guidelines. Artwork must fit within them.
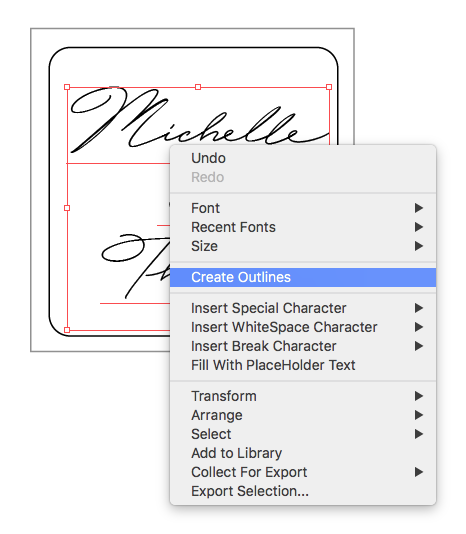
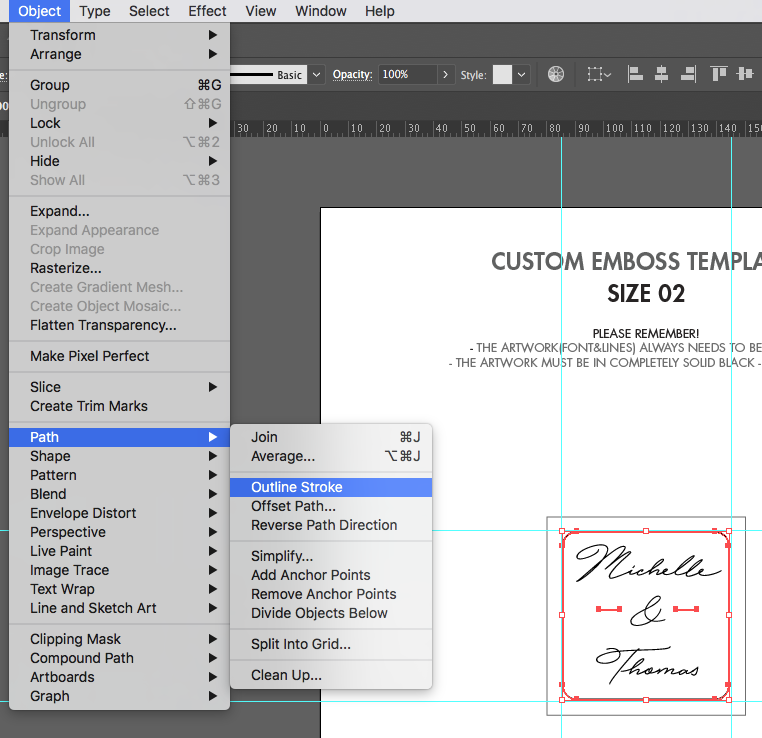
Step 3: Once you're finished with your artwork you're ready to outline every element in your design (convert it to mathematically defined lines and curves).
To outline text: Right click on the text using the selection tool then click → Create Outlines. You can also use the keyboard command Ctrl+Shift+O (Windows) or Cmd+Shift+O (Mac).
To outline stroke lines: Select the element you wish to outline and click Object → Path → Create Outlines → Outline Stroke.
How to outline text
How to outline paths
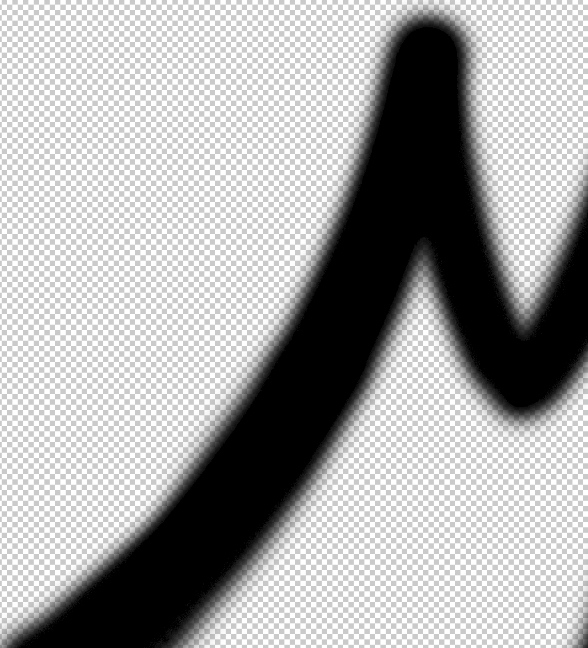
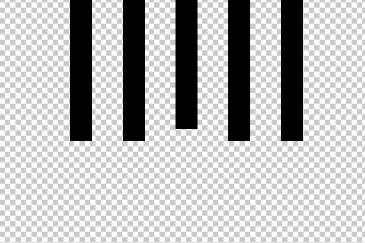
Step 4: Once you've outlined your file it's time to check the quality of the artwork. Zoom right in to ensure you're happy with it. Often a design will look good at 100%, but after zooming in you can see that the lines are jagged, messy or misaligned. This will become very obvious when we create the block, and your embossing may not look good.
You should also click Shift+Command+D to Show the Transparency Grid, so you can check that only 100% black objects remain.
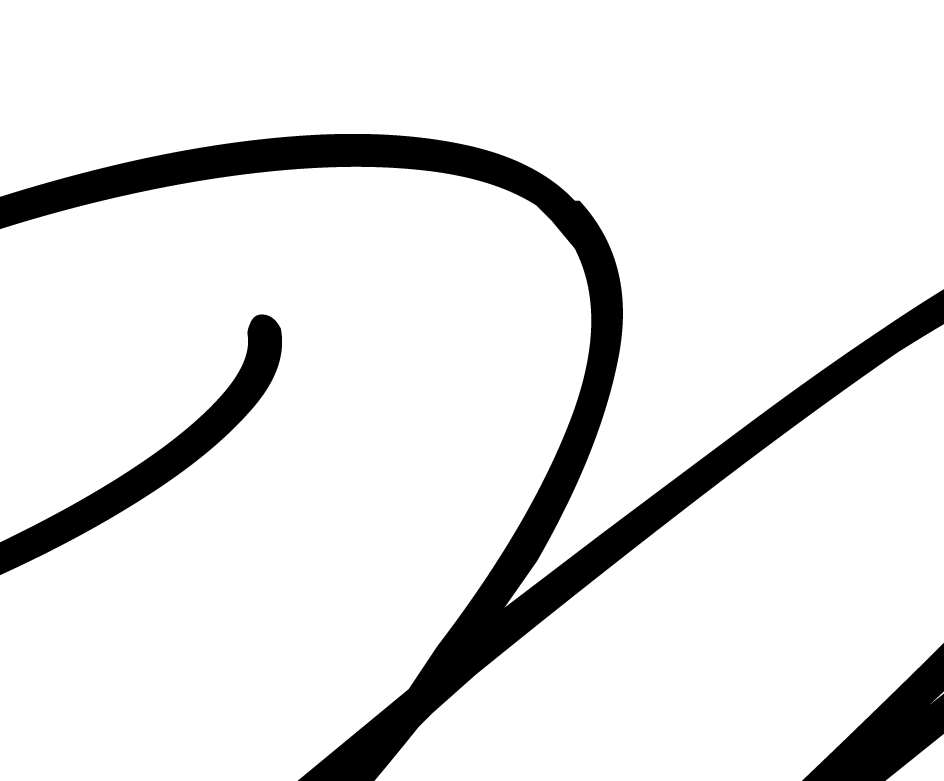

A font with jagged edge (click + to enlarge)

Example of misalignment
Click Shift+Command+D to show the transparency grid
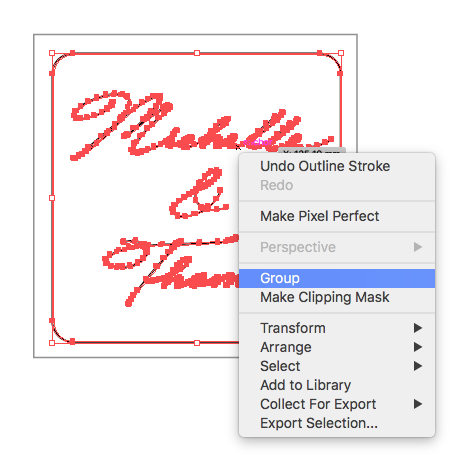
Step 5: Select all your artwork elements (Command+A). Then right-click your mouse and select ‘Group’ (or Cmmd+G on MacOS, Ctrl+G on Windows).
Step 6: Save the file as .eps. You can add helpful information to the filename, such as the name you’ve used for the album order, or the album ID.
Step 7: Order your album in Workspace, selecting Custom Blind Embossing or Custom Foil Embossing when prompted (if foil embossing, select a foil colour too).
Step 8: Place the album order with Queensberry. You won't be able to send us the custom embossing artwork until you've done this! You can cancel the order later if necessary.
Step 9: Once your order is placed, upload the artwork. Go back to Workspace and click Albums in the main navigation. Your album will now have a Queensberry Order Number. Click the blue link to open the album, then the Upload Support Files button. After you enter a brief explanation of the support files you’re uploading, drag and drop your artwork into Workspace. We’ll take it from there!
File set-up using Photoshop
Illustrator is our preferred program for creating Custom Embossings because it creates the vector files we need. If you don’t have access to Illustrator this section will explain how to prepare the artwork in Photoshop. We will create the vector files, the final step, at Queensberry, and there will be no extra charge provided your file matches our specifications.
Even if you have Illustrator this section may help you develop the artwork in Photoshop before importing it to Illustrator.
Important: any jagged outlines in the artwork will be obvious in the final embossing, so artwork needs to be large enough to render lines and curves smoothly. Our Photoshop templates are set to 1200DPI to capture plenty of detail. Check out our Design Tips above for more.
WORKFLOW TO SET UP A CUSTOM EMBOSSING BLOCK IN PHOTOSHOP
Step 1: Download our Custom Embossing templates and open the template you intend to use. Alternatively, you can set up a new file to one of the sizes stated above, ensuring that your resolution is set to 1200DPI and the mode to Grey Scale.
Download our blank templates for Illustrator and Photoshop here
Step 2: Create your design, or place the pre-existing artwork, ensuring every element in the design is 100% Solid Black. To ensure your colour is correct, hover over the text or artwork and open the “Colour Picker.” Move the colour selector down to the bottom left hand corner until it reads that your colour is #00000. You don't need to fill the entire area of the template, but try to fill most of it.
Step 3: Once you're happy with your design zoom right into your file to ensure that the lines and shapes are clean and tidy. Often a design will look good at 100%, but after zooming in you can see that the lines are jagged, pixelated, messy or misaligned. This will become very obvious when we create the block, and your embossing might not look good.
Example of Pixelated/ Soft Font edge
Example of misalignment
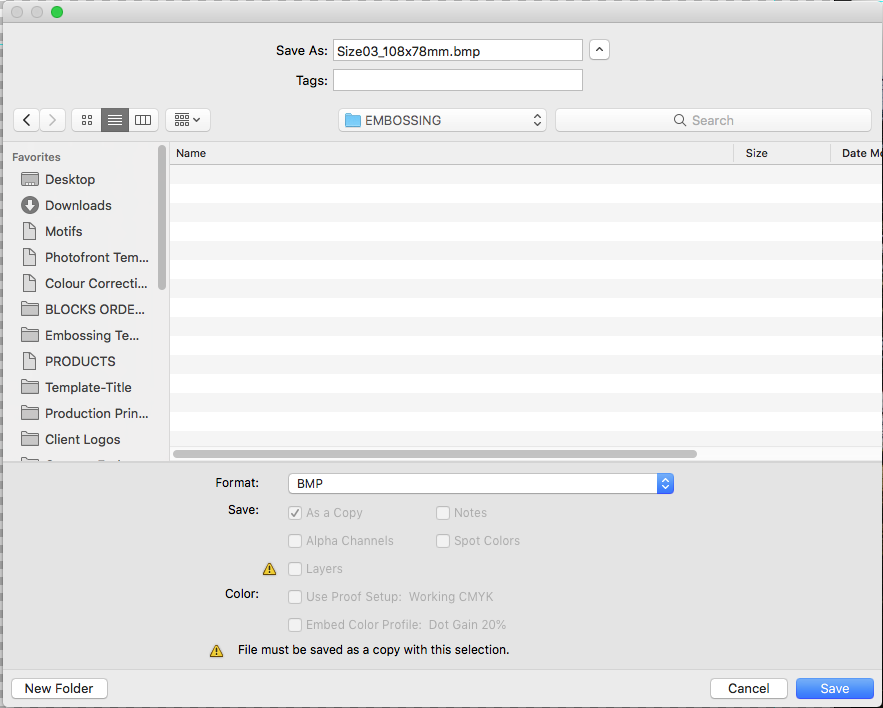
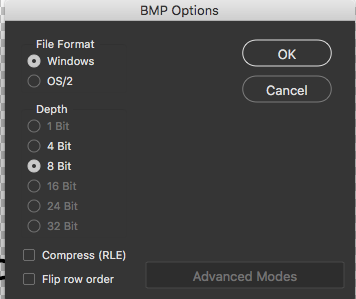
Step 4: Save the file as JPG,PNG,PSD, BMP ensuring they're exported at 1200dpi. You can add helpful information to the filename, such as the name you’ve used for the album order, or the album ID. Please check the BMP options below to ensure you're using the correct settings.
Step 5: Order your album in Workspace, and select Custom Blind Embossing or Custom Foil Embossing when prompted (if foil embossing, select a foil colour too).
Step 6: Place the album order with Queensberry. You won't be able to send us the custom embossing artwork until you've done this! You can cancel the order later if necessary.
Step 7: Once your order is placed, upload the artwork. Go back to Workspace and click Albums in the main navigation. Click the Upload Support Files link next to your order. After you enter a brief explanation of the support files you’re uploading, drag and drop your artwork into Workspace.
Step 8: Once your order has been paid for we will send you a proof of the embossing on the album cover. If there are any issues with the file we'll explain how to fix them prior to ordering your block. Your order will remain on hold until we get the okay to proceed.
Alexandria
Comments